Understanding Aquarium Filtration: Different Types of Filters to Consider
Understanding Aquarium Filtration
Setting up a proper filtration system is one of the most vital steps of maintaining a healthy aquarium. That being said, filtration can be a bit more complex than you might realize at first glance. In this post, we are going to discuss the most common forms of filtration (and what you should use in your tank!).
Different Types of Aquarium Filters
Mechanical Filtration
 When you think of an aquarium “filter”, you’re most likely imagining a mechanical filter. Mechanical Filtration is a simple – yet important – form of filtration that aims to capture large particles (such as uneaten food, fish waste, plant leaves, etc.) from the water column. Capturing waste before it has a change to decompose is crucial to maintaining good water quality.
Mechanical filters can take a few forms. Here are a few of the most common types that you should consider when setting up a tank:
- Hang on Bank Filters: HOB filters are the most common form of mechanical filtration. HOB filters sit conveniently on the back of your tank and cycle water through a chamber. This chamber contains crucial filtration media (sponges, pads, cartridges) that help remove hazardous particles from the water column. Generally, HOB filters are good for tank under 40 gallons (or maybe larger tanks that don’t house any sensitive fish).
- Canister Filters: If you’re setting up a tank larger than 40-50 gallons, a canister filter is the way to go. Canister filters sit outside of the tank and use a pump to draw water – for this reason, they are usually much larger than HOB filters and can process much more water. In addition, canister filters generally have room for a lot of filtration media, ensuring sparkling clean water once it makes its way back to your tank.
- Sponge Filters: Sponge filters are extremely simple – they sit inside the tank and use air flow to draw water through a sponge. Although they definitely don’t stack up against HOB and canister filters in terms of power, sponge filters are extremely useful in certain situations. For example, sponge filters are gentle enough to be used with fry or shrimp (since they won’t suck up even the smallest of creatures).
Chemical Filtration
Most aquarium owners usually don’t get into chemical filtration until they’re a bit more advanced. That being said, chemical filtration can be extremely useful for certain setups and scenarios (such as for those battling algae).
But how does chemical filtration work?
Chemical filtration works by absorbing harmful compounds from the water column at a microscopic level. PhosBan, for example, helps removes phosphates (for those that don’t know, phosphate is basically algae fuel). Other, more advanced, chemical filtration medias such as Chemi Pure Elite and All-In-One Biopellets help remove nitrites and nitrates along with phosphates.
Chemical filtration medias such as those discussed above can vary in ease of use. Chemi Pure, for example, comes pre-packed in bags that can be conveniently placed within your HOB or canister filter. Biopellets and GFO, on the other hand, often require reactors to be used effectively.
Biological Filtration
Biological filtration is arguably the most important form of filtration for any fish tank – in fact, none of us would be able to keep an aquarium without it. In short, “biological filtration” refers to the beneficial bacteria within your tank that convert harmful compounds (ammonia & nitrite) into less harmful compounds, such as nitrate. Without these beneficial bacteria, ammonia would build to deadly levels in a matter of days.
So, what can you do to encourage strong growth of beneficial bacteria?
First of all, giving your tank enough time to cycle in an absolute must. During this time, beneficial bacteria levels build up within your substrate, rockwork, and filter media. Adding fish to your aquarium too soon in the cycling process (before the beneficial bacteria are strong enough to convert ammonia to nitrate) usually doesn’t end to well.
Another important step in maintaining strong beneficial bacteria levels in your tank is cleaning your filter media properly. When cleaning out your mechanical filter, it may be tempting to rinse the entire pad/sponge under a faucet – this is not the correct way to do it. Tap water usually has trace levels of chlorine that will kill off your beneficial bacteria. Instead, get a small bowl of water from your established tank and rise the filter media in that water. Doing this will rinse out the waste particles, but also allow the beneficial bacteria to survive within the media.
Reference: BuildYourAquarium.com
Thank you to our friend Mason at www.BuildYourAquarium.com for writing this post!
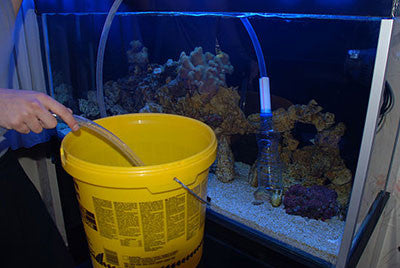
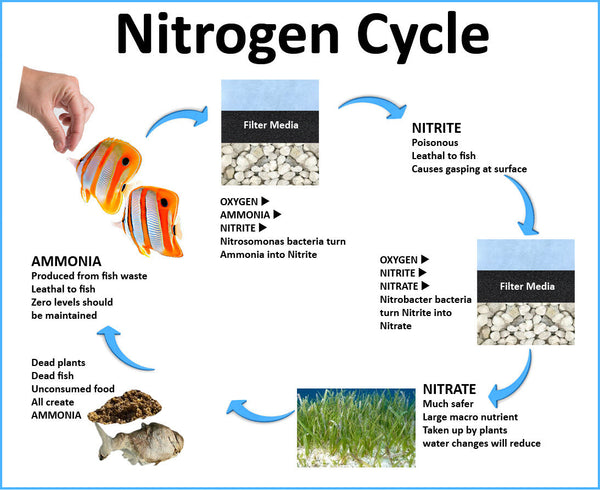
 This is an example of minimizing Mother Nature's perfect filtration system in order to provide your fish with the perfect habitat. Hopefully you have chosen to artificially stimulate the cycling process so that it is well established prior to inserting your fish. If you have not it is very important that you keep a very close eye on them while the tank is undergoing its cycling process. The spikes in ammonia and nitrite levels can be severely harmful to fish if they are exposed to it for too great a period of time, and they will likely begin to show signs of distress during these periods of the cycling process. If this becomes severe their conditions can be aided by changing a portion of the water in order to dilute the concentration of these products.

 Ocean water is the natural habitat of all saltwater marine animals and, consequently, the best water source for any saltwater aquarium. If ocean water is not available, however, and the owner of a saltwater aquarium does not wish to purchase a pre-made saltwater solution it is possible to make saltwater. It is important to use a sea salt mixture that is free of impurities rather than table salt when creating saltwater to reproduce the natural environment as accurately as possible. These mixes can be purchased from any store that specializes in the sale of tropical fish.