0 Cart
Added to Cart
    You have items in your cart
    You have 1 item in your cart
    Total
    Check Out Continue Shopping

    Pinky Filters

    The Easiest Way to Setup a Saltwater Aquarium: Part 2

    The Easiest Way to Setup a Saltwater Aquarium: Part 2

    Establishing Live Rocks in an Aquarium

    Aquariums are beautiful particularly ones which are large enough to make the viewer feel as though they have been transported into an underwater wonderland. For many individuals, the inside of a clear glass aquarium is as close as they will ever come to the wonders of the world beneath the ocean's surface, and for that reason an aquarium which is as close to the natural habitat of its inhabitants as possible is a joy unto itself.

    Live rocks, rocks which are covered with both micro- and microorganisms which help to digest the waste produced by the fish, are a vital part of every natural ecosystem. For that reason, it makes sense that they would be an important part of an aquarium environment as well. It is not as simple as dropping a rock into an aquarium and allowing all manner of things to grow on it, however. There is a process that must be followed to ensure optimal benefits for both the large aquarium and the live rock.

    It is very simple to cure live rock before placing it in the aquarium, but this is an important step that must be taken to prevent a buildup of ammonia in the tank which could negatively affect the fish. To cure live rock first select a plastic container that is of a suitable size to hold the amount of live rock which you are working with, then fill it with saltwater. Then place a heater and water pump in the "tank" for optimal temperature and circulation. Once the water has reached the desired temperature remove the heater and pump and half of the water content, then preclean the rock in a bucket of saltwater by swishing it around to remove any lose organisms and debris and place it in the prepared water. Then reinstall the heater and pump and allow nature to do its thing!Setting Up Rocks in Saltwater Aquariums

    Setting Up Rocks in Saltwater Aquariums

    The process is done when an ammonia reading of the water in which the rock resides is at zero and it is no longer giving off an unpleasant odor. Now, it is safe to place the rock in your aquarium and allow Mother Nature's perfect filtering system to work for you.

    The Easiest Way to Setup a Saltwater Aquarium: Part 1

    The Easiest Way to Setup a Saltwater Aquarium: Part 1

    Setup a Saltwater Aquarium

    Everyone has admired the large saltwater aquariums that can be found in the offices of most dentists, physicians, cosmetologists and marine enthusiasts but have believed them to be far too much work to bring into their own homes. Fortunately, this is not the case. While the process of establishing a saltwater aquarium can be a costly one, in terms of manual labor there is a very simple method which almost guarantees success.

    Step 1: Assemble and prepare the equipment. During packaging and production, the aquarium and all of its corresponding parts have almost certainly been exposed to various pollutants, such as dust and chemicals, which will be very harmful to the fish if it is allowed free reign in the aquarium. Prior to use every piece of the aquarium should be washed with hot, fresh water and cleansed with a soft piece of cloth to prevent scratching.

    Step 2: Place all the components in the tank WITHOUT adding any of the decorative features. Then fill the tank to the fill line (which may or may not be already marked on the aquarium-2 to 3 inches from the top is generally adequate to prevent major spillover when the tank is cleaned or the fish fed) with saltwater (if you have chosen to make your own saltwater solution read below for instructions). Turn the tank on and allow it to run for 24 hours to ensure that all components are fully functional.

    **Making Your Own Saltwater**

    Making Your Own SaltwaterOcean water is the natural habitat of all saltwater marine animals and, consequently, the best water source for any saltwater aquarium. If ocean water is not available, however, and the owner of a saltwater aquarium does not wish to purchase a pre-made saltwater solution it is possible to make saltwater. It is important to use a sea salt mixture that is free of impurities rather than table salt when creating saltwater to reproduce the natural environment as accurately as possible. These mixes can be purchased from any store that specializes in the sale of tropical fish. Instant Ocean Kit

    Step 3: Landscape your aquarium. Organic substances are not only more aesthetically pleasing than their plastic counterparts, they provide a more pleasing environment for the fish as well. Keeping in mind that fish generally use what humans consider to be decorations as shelter when in the wild it is important to consider the types of fish which will be inhabiting the tank prior to choosing its decoration.  

    Step 4: Start the 30-day cycling process, during which the ammonia should be tested regularly. This can be done with or without fish in the tank.

    Following these simple steps will allow the amateur marine enthusiast to place aside their fears and enjoy the benefits of a happy, healthy aquarium in the privacy of their own home.

    Introduction to Koi Ponds

    Introduction to Koi Ponds

    Introduction to Koi Ponds

    Koi ponds have become a popular hobby in the world, and the reasons are clear as to why. Koi are beautiful, vibrant fish that can literally light your day. Koi come in many colors, varieties, and kinds, so it is likely that everyone in the world can find at least one type of Koi that would suit their likes. While Koi may be a welcomed beauty to your pond, they also have an interesting history attached to them.

    In Chinese culture, Koi ponds are said to being good luck to their owners. Koi ponds are used as an overall plan to fulfill their lives. Other parts of the world consider Koi ponds as a form of relaxation and serenity. In the united states, more and more people seem to find Koi ponds to be fun more than anything else. No matter what the reason you find to have a Koi pond, they are sure to brighten your life.

    Should You get a Koi Pond

    However, Koi keeping should not be taken lightly. Koi, like any other animal, require time and money to maintain. Many first-time Koi owners fail because they get the idea that keeping Koi is easy in some way. Do not let this discourage you though, as educating yourself will greatly improve your chances of succeeding.

    Should You get a Koi PondIt is important for you to learn all you can BEFORE you begin obtaining the things you need for Koi keeping. This way, you will not slip up and should replace anything that you have already done or bought. Planning will not only save your money, but it will potentially save your sanity as well.

    It is important to learn the information for yourself rather than relying on other sources. People such as your product dealer and pond builder will have limited knowledge, but should not be trusted for a reliable source, as they are selling products and may be bias. Plus, once you are at home with your Koi, your product dealer or pond builder may not be available to help you in the event of a problem.


    Koi Have Personality

    You would not believe that Koi have personalities like other animals. They are social, and can even be trained to eat directly from their owner’s hands. The more time you spend with your Koi, the more you will notice each Koi has individual characteristics and traits.

    Koi have been known to live for up to 200 years at time, but generally the average lifespan of a healthy Koi is about 30 years. So, if you are looking for a long-time pet companion, Koi may be a good choice.


    Building Your Koi Habitat

    Before ever buying Koi, you must create a proper habitat for them. This is where information from your pond builder and supplier will come in handy. However, you should not rely on the opinions of just one person. It may be a god idea to do research on your own, before you go to purchase the materials needed for you pond. Because of its popularity, an unlimited supply of resources can be found on the topic of Koi keeping. Visit your local library, fishery center, or research online. There are quite a few things needed to sustain a habitable pond.

    When it comes to pond size, bigger is always better. Koi have a habit of growing rather fast, so you should consider pond size at the same time you are considering how many Koi you are going to put it in.

    Your filtration system is extremely important. There are 2 types of filtration, mechanical and biological. Mechanical filtration relives the pond of solids such as dead algae, insects, and Koi wastes. It is important to have enough filtration to sustain the size of the pond, and the amount and size of your Koi. Biological filtration causes a nitrogen cycle, which is what removes dissolved wastes from your pond. Without biological filtration, built up waste will turn into ammonia and kill your Koi within just a few days.

    Besides the technical aspects of your pond, you will also can create a visually appealing area as well. Waterfalls, fountains, and other water features will not only add a visual show to your pond, but it will also create movement and sound. A variety of plants and flowers are also available for your pond.

    Koi Ponds during the spring

    Koi Ponds during the spring

    Koi Ponds during the spring

    Making sure your pond is ready for the coming seasons should not take you more than a weekend to complete, and will ensure that you have a successful water garden for the remainder of the year.

    Your Koi pond will literally come to life at the first of springtime. The Living organisms in your pond have spent the previous winter in a proverbial hibernation, and are ready to come to life at the first signs of warm weather. This is the perfect time to begin maintenance on your pond before the fish, plants, and other pond life come back to live from their winter slumber. As the days begin to get warmer, your pond will start drastically changing. If you are not careful, you may miss this much-needed opportunity to perform maintenance. Generally, watch for temperatures around 50 degrees, as this is the perfect time.

    The maintenance needed on your pond will largely depend on what happened during the previous winter. If the previous winter was hard, chances are you will need to perform more changes, so it may be a good idea to start as soon as you start noticing the weather changes. However, some spring maintenance will have to be completed every year, no matter how harsh or how mild the previous winter was.

    Koi Pond Water Quality

    Koi Pond Water QualityYou may notice that the water in your pond is extremely clear when the seasons are changing from Winter to Spring. Do not let this fool you, as there are several factors that will cause problems once Summer comes if you do not remedy these issues ahead of time.

    During the Fall and Winter months, organic material such as leaf’s and plant material may have found its way into your pond. While the water seems clear at the time, the organic material placed a large amount of nutrients into your pond, which will cause a surge of algae growth once spring arrives. If algae were not enough, the large amount of organic material in your pond will start to decompose, and will reduce the oxygen content in your water.

     Since your water is perfectly clear, it is the perfect time to clear all this unwanted debris and slit from your pond. This can be completed in several ways.

    1. Hire a pond professional from your local dealer or pet store. They will have the equipment needed to vacuum most the debris and slit out of your pond. While this is a more costly option, you will have the assurance that the majority of the problem causing material will be removed from your pond.
    2. If hiring a professional is not an option, you may want to consider using a fine mesh net to scoop up as much debris as possible. The only issue is most nets will only stir up the slit in your pond, rather than remove it.
    3. Once you have removed unwanted debris, you must then test your water. Winter seems to cause the pH levels to change. At the start of Spring, your pH level should be an 8. This can be achieved by topping your pond off with treated tap water which is buffered to be slightly alkaline by your local water company.

    Maintaining your Fish

    Spring time is a very weak time for your fish, because they have not eaten for months, and have may be living on a low level of energy. This cause your Koi to be more susceptible to attacks from organisms such as bacteria, parasites, viruses, and fungi. This makes Spring the opportune time to take all preventative measures possible. Adding a large spectrum of treatment solutions will greatly reduce the amount of disease causing pests and material. Once the temperature warms up, another dose of this treatment will ensure that your Koi will be well protected while they redevelop their immune systems. Once temperatures warm up, your Koi immune systems will be effective enough to protect themselves from disease.

    Aquarium Care Guide: New Tanks

    Aquarium Care Guide: New Tanks

    Aquarium Care Guide

    When starting a new aquarium, it is important to understand the nitrogen cycle.  Many new aquarium owners jump into the hobby of fish keeping too quickly.  Before purchasing fish, the aquarium must be cycled.  This could take anywhere from twenty-four hours to four weeks.  In an established aquarium, there are certain bacteria that help the breakdown of ammonia to nitrates, but they are not present in a new tank because they are generated from existing fish. If there are no existing fish, then there are no good bacteria.

    The basic principle of the nitrogen cycle is this.  Fish eat food and generate waste.  That waste along with excess food and plant debris become ammonia in the aquarium. Ammonia is toxic to fish and needs to be broken down.  That's why the nitrifying bacteria is important.  This bacteria, turns the ammonia into nitrites which are more tolerable to fish than ammonia.  Next, different nitrifying bacteria will turn the nitrites into nitrates, which are even less toxic to the fish and other aquarium life.  The nitrates are collected and minimized by filters; however, they will eventually accumulate in the tank.  Regular water changes are required to remove the nitrates from the water.

    New Aquarium Tank Guide

    New Aquarium Tank Guide
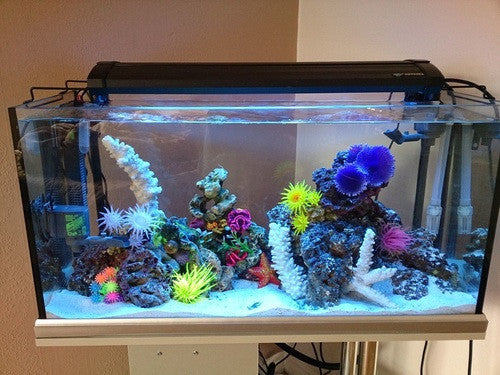
It is important to set up and run an aquarium before any fish are introduced into the environment.  Wash the tank and any substrate and decorations thoroughly with water. Don't use any soap.  Fill the tank with de-chlorinated water and attach filters and lighting.  Allow the tank to cycle until the water is no longer cloudy and sufficient P.H and water temperatures have been established. 

    Now it is time to purchase the fish!  Buy hardy fish such as danios, barb, Gouramis, and live bearers.  They should be able to withstand the high nitrite levels and ammonia in the new aquarium.  Only introduce about four fish at a time. Float the fish in the bag in the aquarium for about fifteen minutes before adding them to the tank.  This will help the fish become acclimated to the water temperature in their new home.  When adding the fish, be careful not to allow the water from the bag into the aquarium.  It may be contaminated, or will at the very least, throw off the temperature and P.H.  Allow the fish about two hours to become acclimated before feeding.

    Gouramis

    Starfire Red Danio Tiger Barb

     Gourami

    Starfire Red Danio Tiger Barb


    Only feed an amount that can be consumed in the first two to five minutes.  Overfeeding is a common problem in an aquarium.  It is important not to overfeed, because excess food will become debris adding to the ammonia levels.  This is especially important in new aquariums that lack nitrifying bacteria.  Test the water P.H. every day within the first month. Watch the tank for cloudiness; if the aquarium becomes cloudy, it may be necessary to add a clarifier.  Monitor the fish for signs of stress or illness.  A healthy fish will be swimming regularly.  Lethargic fish will usually hover near the surface of the aquarium.  After about a week change approximately ten percent of the water and begin regular maintenance.  Don't forget to make sure you keep Pinky Filters installed :)